Making an accessible Breadcrumb Navigation using TailwindCSS and NextJS

Breadcrumb Navigations are starting to appear in many applications nowadays, mostly in dashboards. Today we are going to look at building a Breadcrumb navigation that is accessible and styled with TailwindCSS. We are going to be using NextJS (specifically the NextJS Router) for this tutorial. However, you can follow the same steps for other frameworks, it may also not be a React framework. Just make sure to look up and implement the proper router logic and create the components properly, styling will remain the same.
🍞 Ok, what is a Breadcrumb Navigation?
You must have come across navigation bars, something like this -


The first example is from the Vercel dashboard and the second one is from the Netlify dashboard.
We can see that it gives us a brief idea of what page we are on and also lets us navigate back easily (yes, those breadcrumb items are usually links).
At times, these Breadcrumb Links also have an associated dropdown, something like this -
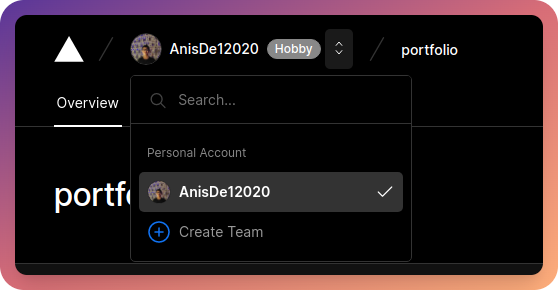
We will not be building this today as it is a more advanced use case, however, in larger projects, it will be a useful thing to have as it makes navigation easier.
Initializing a NextJS application with TailwindCSS
First of all, let us create a new NextJS application
npx create-next-app breadcrumb-example
# OR
yarn create next-app breadcrumb-example
Now, let us remove some of the boilerplate code and existing CSS (except the global.css file) as we are going to be adding TailwindCSS.
A cleaned up pages/index.js will look like this -
import Head from "next/head";

export default function Home() {
  return (
    <div>
      <Head>
        <title>NextJS Breadcrumb Example</title>
        <meta
          name="description"
          content="A simple example application for a NextJS Breadcrumb tutorial"
        />
        <link rel="icon" href="/favicon.ico" />
      </Head>

      <main>
        <h1>Breadcrumb Navigation Example with NextJS</h1>
      </main>
    </div>
  );
}
Also, delete Home.module.css under the styles directory.
Adding TailwindCSS
We are going to be simply following the office guide on adding TailwindCSS to a NextJS application.
First of all, let us install TailwindCSS, PostCSS, and AutoPrefixer -
npm install -D tailwindcss postcss autoprefixer
# OR
yarn add -D tailwindcss postcss autoprefixer
Also, run the following command to generate the tailwind.config.js and postcss.config.js files -
npx tailwindcss init -p
Now, replace the tailwind.config.js file with the following -
module.exports = {
  content: [
    "./pages/**/*.{js,ts,jsx,tsx}",
    "./components/**/*.{js,ts,jsx,tsx}",
  ],
  theme: {
    extend: {},
  },
  plugins: [],
}
Now, add the following code to the globals.css file under the styles directory -
@tailwind base;
@tailwind components;
@tailwind utilities;
For this example, I am going to go for a dark mode version, just so that the screenshots I take are easy on the eyes. For this, I will add this to my globals.css file -
@layer base {
  body {
    @apply bg-black text-white;
  }
}
I am also going to add some styles to the h1 tag we added earlier in the index.js file -
<h1 className="mx-8 md:mx-16 lg:mx-32 mt-32 text-2xl md:text-3xl lg:text-4xl">
    Breadcrumb Navigation Example with NextJS
</h1>
This is what the website looks like now -

Building the Breadcrumb Navigation
Time for the fun part, let us build the breadcrumb navigation!
Let us make a new directory called components. This is where we will be putting in our Breadcrumb and BreadcrumbItem components.
Now, let us make the Breadcrumb. Create a file called Breadcrumb.jsx and add the following code -
import { Children } from "react";
import { Fragment } from "react/cjs/react.production.min";

const Breadcrumb = ({ children }) => {
  const childrenArray = Children.toArray(children);

  console.log(childrenArray);

  const childrenWtihSeperator = childrenArray.map((child, index) => {
    if (index !== childrenArray.length - 1) {
      return (
        <Fragment key={index}>
          {child}
          <span>/</span>
        </Fragment>
      );
    }
    return child
  });

  return (
    <nav className="mx-8 md:mx-16 lg:mx-32 mt-8">
      <ol className="flex items-center space-x-4">{childrenWtihSeperator}</ol>
    </nav>
  );
};

export default Breadcrumb;
Let us go over this code step by step. First of all, we make a new component called Breadcrumb. We are accepting one prop, that is the children. These children will include the Breadcrumb Items, that is the links to the pages.
We then convert the children into an array using the Children.toArray() function.
If we log the childrenArray variable to the console, we should see something like this -
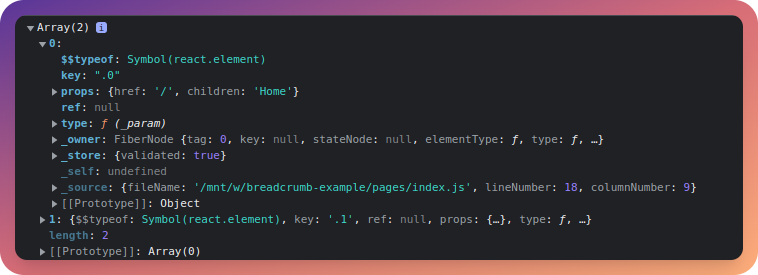
Here, we can see that it contains all the metadata about the component such as the props, component type, etc.
Next, we take this array and map over it. We check if it is the last element of the array by comparing the index of the element with the length of the array. If it is not the last element, we return it as a React Fragment with the child element itself, as well as a separator (/ in this case as it is the most common one but you can change it as well). If it is the last element of the array, we just return the element, without the separator.
Next, the Breadcrumb component returns a nav element with an order list (ol). The ordered list is a flexbox and the space-x-4 class adds a margin of 1 rem between all children elements (the breadcrumb items in this case).
Lastly, we export the component to be used later.
Now, let us create another file called BreadcrumbItem.jsx and add the following code to it -
import Link from "next/link";

const BreadcrumbItem = ({ children, href, ...props }) => {
  return (
    <li {...props}>
      <Link href={href} passHref>
        <a>{children}</a>
      </Link>
    </li>
  );
};

export default BreadcrumbItem;
Here, we are creating a new component called BreadcrumbItem which takes in a children and a href prop. We also take in additional props which will be passed into the li prop. Do note that each BreadcrumbItem is a list item and hence it fits in the ordered list we created earlier in the Breadcrumb component.
Time to add the Breadcrumb to our application. For the time being, let us add the following code to our index.js file under pages -
<Breadcrumb>
    <BreadcrumbItem href="/">Home</BreadcrumbItem>
    <BreadcrumbItem href="/">Home</BreadcrumbItem>
</Breadcrumb>
Also, don't forget the imports
import Breadcrumb from "../components/Breadcrumb";
import BreadcrumbItem from "../components/BreadcrumbItem";
This is what the home page should look like now -

Right now, we are rendering the breadcrumb on the home page and hardcoding the page names. However, this is not what we should be doing, let us look at a better approach where the routes are inferred using the router component.
Dynamically creating the breadcrumb items
Till now, we were manually passing in the breadcrumb items into the Breadcrumb component. However, this approach is not suitable for larger applications.
I have made some changes to the _app.js file to dynamically create the breadcrumb items -
import { useRouter } from "next/router";
import { useEffect, useState } from "react";
import "../styles/globals.css";
import Breadcrumb from "../components/Breadcrumb";
import BreadcrumbItem from "../components/BreadcrumbItem";

function MyApp({ Component, pageProps }) {
  const router = useRouter();
  const [breadcrumbs, setBreadcrumbs] = useState();

  useEffect(() => {
    const pathWithoutQuery = router.asPath.split("?")[0];
    let pathArray = pathWithoutQuery.split("/");
    pathArray.shift();

    pathArray = pathArray.filter((path) => path !== "");

    const breadcrumbs = pathArray.map((path, index) => {
      const href = "/" + pathArray.slice(0, index + 1).join("/");
      return {
        href,
        label: path.charAt(0).toUpperCase() + path.slice(1),
      };
    });

    setBreadcrumbs(breadcrumbs);
  }, [router.asPath]);

  return (
    <>
      <Breadcrumb>
        <BreadcrumbItem href="/">Home</BreadcrumbItem>
        {breadcrumbs &&
          breadcrumbs.map((breadcrumb) => (
            <BreadcrumbItem key={breadcrumb.href} href={breadcrumb.href}>
              {breadcrumb.label}
            </BreadcrumbItem>
          ))}
      </Breadcrumb>
      <Component {...pageProps} />
    </>
  );
}

export default MyApp;
Let us go through this code. First of all, we are importing the NextJS router, the useEffect hook, the useState hook, the Breadcrumb component and the BreadcrumbItem component. Also, you can remove the Breadcrumb component from the index.js file.
Then, inside the MyApp component, we are initializing the router and creating a state to store out breadcrumbs. Next, we have an useEffect hook which fires when the page loads and whenever router.asPath changes.
In the useEffect hook, firstly, we remove the query parameters from our path (which we get from router.asPath). Next, we split it into an array called pathArray and call the shift() function on it to remove the first element (which is the home route).
Next, we also filter it out so that we don't get any other blank path (this is because the NextJS router returns a blank element at the last index if we are on the home route).
After that, we map over it and generate a new array called breadcrumbs. The breadcrumbs array is an array of objects that contain the href and label for the breadcrumb items.
Lastly, we save it to the breadcrumbs state so that we can use it outside the useEffect hook.
Next, in the JSX, we add the Breadcrumb component and add a BreadcrumbItem for the home route to it.
Then, we make sure that the breadcrumbs array is not null and map over it, adding the other BreadcrumbItem components.
Now, to test it out, create a directory called dashboard under pages and add 2 files - index.js and [id].js.
Add the following code to index.js -
import Head from "next/head";

const Dashboard = () => {
  return (
    <div>
      <Head>
        <title>Dashboard | NextJS Breadcrumb Example</title>
        <meta
          name="description"
          content="A simple example application for a NextJS Breadcrumb tutorial"
        />
        <link rel="icon" href="/favicon.ico" />
      </Head>

      <main>
        <h1 className="mx-8 md:mx-16 lg:mx-32 mt-32 text-2xl md:text-3xl lg:text-4xl">
          Breadcrumb Navigation Example with NextJS - Dashboard Page
        </h1>
      </main>
    </div>
  );
};

export default Dashboard;
Now, add the following code to [id].js -
import Head from "next/head";

const Project = () => {
  return (
    <div>
      <Head>
        <title>Dynamic Route | NextJS Breadcrumb Example</title>
        <meta
          name="description"
          content="A simple example application for a NextJS Breadcrumb tutorial"
        />
        <link rel="icon" href="/favicon.ico" />
      </Head>

      <main>
        <h1 className="mx-8 md:mx-16 lg:mx-32 mt-32 text-2xl md:text-3xl lg:text-4xl">
          Breadcrumb Navigation Example with NextJS - Dynamic Route Page
        </h1>
      </main>
    </div>
  );
};

export default Project;
Now, let us head over to /dashboard
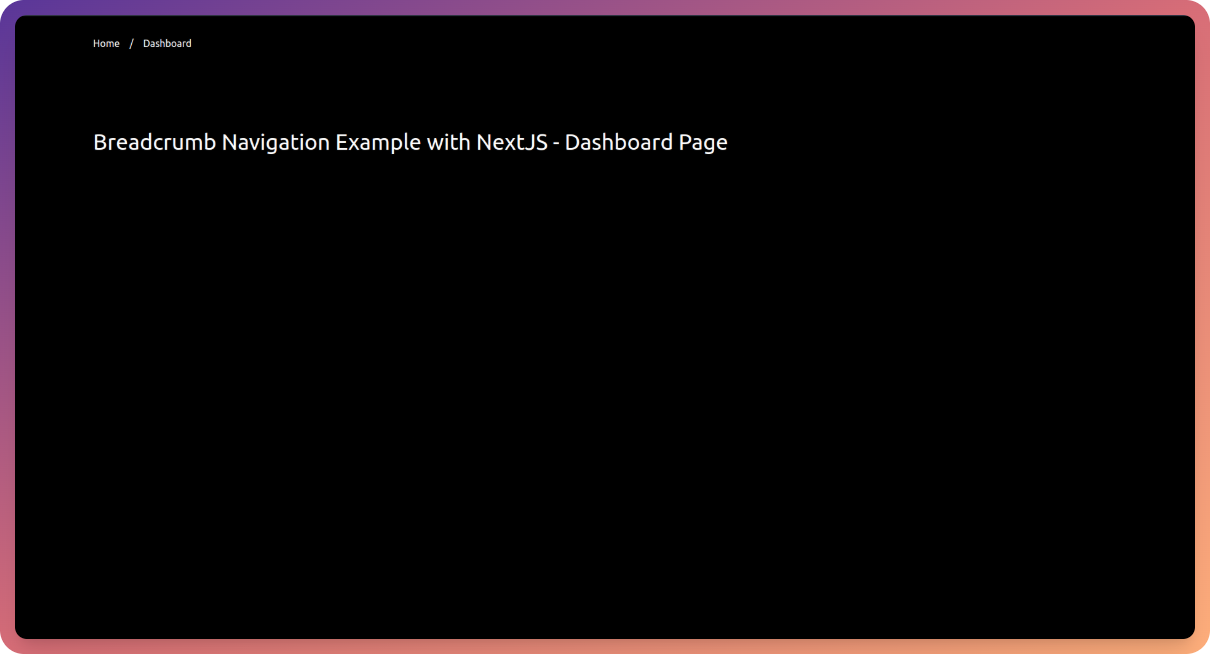
We can see that the breadcrumb works properly and the links work too!
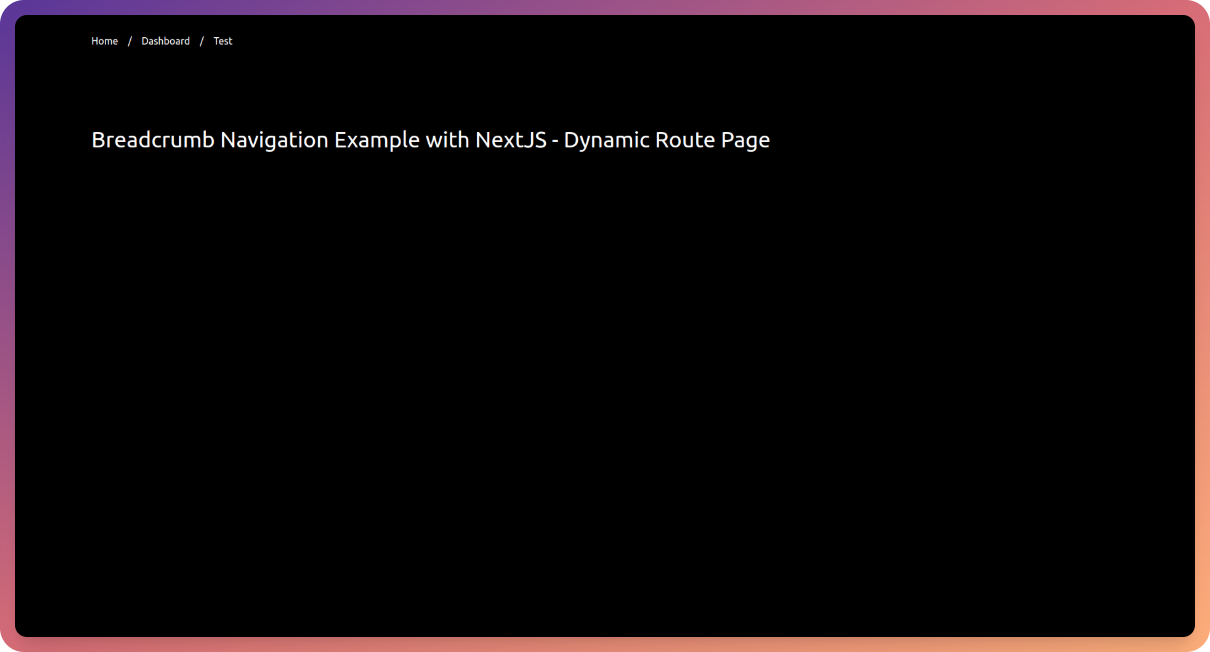
Now let us head over to /dashboard/test and we can see that the breadcrumb displays the dynamic route -
Making it accessible
First of all, let us add an aria-label of value breadcrumb to our Breadcrumb component -
import { Children } from "react";
import { Fragment } from "react";

const Breadcrumb = ({ children }) => {
  const childrenArray = Children.toArray(children);

  const childrenWtihSeperator = childrenArray.map((child, index) => {
    if (index !== childrenArray.length - 1) {
      return (
        <Fragment key={index}>
          {child}
          <span>/</span>
        </Fragment>
      );
    }
    return child;
  });

  return (
    <nav className="mx-8 md:mx-16 lg:mx-32 mt-8" aria-label="breadcrumb">
      <ol className="flex items-center space-x-4">{childrenWtihSeperator}</ol>
    </nav>
  );
};

export default Breadcrumb;
Now, let us make a small change to our _app.js to pass in a prop to the BreadcrumbItem called isCurrent with a boolean value. The value is true for the last breadcrumb item, that is, the current page.
import { useRouter } from "next/router";
import { useEffect, useState } from "react";
import "../styles/globals.css";
import Breadcrumb from "../components/Breadcrumb";
import BreadcrumbItem from "../components/BreadcrumbItem";

function MyApp({ Component, pageProps }) {
  const router = useRouter();
  const [breadcrumbs, setBreadcrumbs] = useState();

  useEffect(() => {
    const pathWithoutQuery = router.asPath.split("?")[0];
    let pathArray = pathWithoutQuery.split("/");
    pathArray.shift();

    pathArray = pathArray.filter((path) => path !== "");

    const breadcrumbs = pathArray.map((path, index) => {
      const href = "/" + pathArray.slice(0, index + 1).join("/");
      return {
        href,
        label: path.charAt(0).toUpperCase() + path.slice(1),
        isCurrent: index === pathArray.length - 1,
      };
    });

    setBreadcrumbs(breadcrumbs);
  }, [router.asPath]);

  return (
    <>
      <Breadcrumb>
        <BreadcrumbItem isCurrent={router.pathname === "/"} href="/">
          Home
        </BreadcrumbItem>
        {breadcrumbs &&
          breadcrumbs.map((breadcrumb) => (
            <BreadcrumbItem
              key={breadcrumb.href}
              href={breadcrumb.href}
              isCurrent={breadcrumb.isCurrent}
            >
              {breadcrumb.label}
            </BreadcrumbItem>
          ))}
      </Breadcrumb>
      <Component {...pageProps} />
    </>
  );
}

export default MyApp;
For the initial home route, we are simply matching router.pathname with /.
Now in the BreadcrumbItem.jsx file, change the code to the following -
import Link from "next/link";

const BreadcrumbItem = ({ children, href, isCurrent, ...props }) => {
  return (
    <li {...props}>
      <Link href={href} passHref>
        <a
          className={isCurrent && "text-blue-500"}
          aria-current={isCurrent ? "page" : "false"}
        >
          {children}
        </a>
      </Link>
    </li>
  );
};

export default BreadcrumbItem;
Here, we are setting aria-current to page if it is the current route.
Conclusion
I hope you have a working Breadcrumb navigation now. Feel free to experiment with it and have a nice day 😁🤞